Sunday, January 31, 2010

Chocolate Waffles

CHOCOLATE WAFFLES
The BWE as Trey called them.
Best Waffles Ever.
They taste like chocolate cake. I sprinkled them with powdered sugar. My children still wanted
to dip them in maple syrup. Can you believe that? They had quite the rush!!


I had a hard time photographing this. In hindsight, I should have just snapped pictures of the
kiddos while they ate them. I couldn't decide if they looked better with or with out the sugar. I
decided on these 2 pics for y'all. It's a shame, but it was the best I could do. I'm sure y'all love me
anyway. Not for my waffles. Not for my photography skills. Just cause I am so loveable.

First things first. You need one of these to make these waffles. When he's not dragging things out

of the little beverage fridge, you need to hold him on your hip. He is extremely helpful.


Then you need all of these.

And one of these. You can tell that I use mine a lot.


Oh.......and some of this.


Oh........and this too. Can you tell where I shop? Food Lion happens to be the only grocery store
on the island. I can't convey to you how happy I am to have it too. It saves me a trip all the way
OVER THE BRIDGE!!!


Alright, I think I have included photo's of EVERYTHING this time. JOY!
You need 1 1/2 cups of flour dumped into a big bowl. Like this. I used my GIANT plastic
measuring cup. See???


Add the sugar to that. 3 tablespoons.


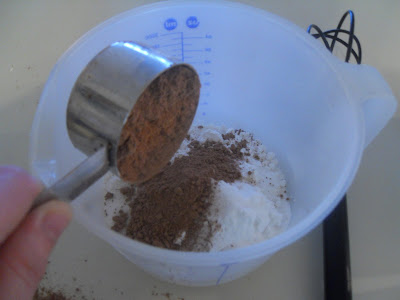
Cocoa powder. 1/2 cup of it.


I stole Trey's measuring spoon for this one. Isn't it cute?
Throw in 1 teaspoon each of baking powder and salt. I did not feel the need to give y'all 2
pictures as they look exactly the same. Trust me.

When you're done with that go ahead and throw in 1/2 tsp of baking soda.


Grab your whisk and whisk this all together.
It would be so much easier if that toddler on my hip would learn how to take the pictures for me!


Grab your stick of butter and lop off 2 tablespoons of it. Put it in a bowl, and melt it however you
choose. I used the microwave of course.


Crack your 3 eggs into your melted butter.


Whisk it all together.


Add 1 tsp of pure vanilla extract.


Measure out 2 cups of buttermilk and add it to the butter and eggs.


Just like this. "They" say that this should really be room temperature, but what do they know?
Who are they? I used cold buttermilk, and my waffles were just fine.
Whisk that all together.


Throw your wet mix over your dry goods that you mixed up earlier. Give that a really good
whisk to make sure it is all mixed up.


Like this.


Stir in 3/4 cup of chocolate chips. I used mini milk chocolate chips.


Now, just let it chill.
Not literally.
Let it rest in the bowl for about 5 minutes.


Pour onto a hot waffle iron.


Close the waffle iron, and cook the recommended time for your iron.
(I have no photo of this)

(do you really need one anyway?)


Remove your waffles.
This is where I had trouble making these look pretty. Here it is just the same.
I sprinkled some powdered sugar on them.
The kids dipped them in maple syrup.
They tasted like chocolate cake.
Chocolate cake for breakfast.
I was best Mommy in the world.
For 1 day.


Chocolate waffles
1 1/2 cups flour
3 tablespoons sugar
1 tsp baking powder
1 tsp salt
1/2 tsp baking soda
3 eggs, beaten
2 tablespoons butter, melted
1 tsp pure vanilla extract
3/4 cup chocolate chips
Preheat waffle iron.
In a medium bowl whisk together flour, sugar, cocoa, baking powder, baking soda, and salt.
Melt 2 tablespoons of butter in a medium bowl.
Add 3 beaten eggs.
add 1 tsp vanilla.
whisk together.
Pour the wet ingredients into the dry ingredients and stir until well combined. Fold in the chocolate chips and allow to rest for 5 minutes.
Ladle the recommended amount of batter into a hot waffle iron. Allow to cook until the waffles are crispy on both sides and easily removable from the iron.






Wednesday, January 27, 2010

Crash Hot Potatoes and Cheesy Barbecue Chicken

I am really cheating here. I stole BOTH of these recipes from other blogs. I have made this cheesy barbecue chicken MANY times and we love it at my house. I made it last night because Kaylee has been requesting it. I apologize for the not-so-prettiness of the plate, but these two things should NEVER be photographed together. If you want the original recipe for cheesy barbecue chicken click on the link at the end of the post.
Let's get this party started. Shall we?


The ingredients. You can see my man's legs in this pic. It looks like he is standing in front of my stove. I am sure there must have been some reason for that???
Any barbecue sauce you like, boneless, skinless chicken breasts
bacon, onions, grated cheddar, salt and pepper. You're also going to need a tad bit of olive oil for your pan.


Marinate the chicken in the barbecue sauce. I let mine marinate about 3 hours. You can marinate this for an hour or up to 24 hours.


Cook your bacon up nice and crispy. I like to do mine on a sheet in the oven. It keeps me from getting popped with hot baking grease and keeps Jackson safer too. He tends to be on my hip a lot.


However you do it, get your bacon nice and crispy, drain on paper towels and set aside. You'll need it in a bit.


Grab up your onions. I used 3 because they were pretty small, but I ended up only needing 2.


Cut your onions in half and then slice them up into nice littl half moons.
Like this. I know the picture is horrible and the knife is EXTREMELY ugly, but it's the sharpest knife I own.


After your onions are sliced up all nice and pretty, grab that olive oil and throw about a tablespoon or 2 into an oven proof skillet. I used my cast iron.
Heat that up til it's nice and shimmery and hot.


Throw your onions in and let them caramelize. To do this you just keep giving them a flip, making sure they are turning brown and not black. This took me about 10 minutes.


Like this..........


When they are caramelized, remove them from the pan, and set aside. You will need them in a bit as well.


Now, grab that chicken that you have marinating. Heat another tablespoon of olive oil in the same skillet you cooked your onions in. When the skillet is nice and hot, throw the chicken in. Let it cook for about 2 minutes, flip it and cook the other side for a 2 more minutes.
I am not sure where my photography skills went?


Now, grab those caramelized onions you made earlier. Grab a big ol' bunch (3 tablespoons maybe?) and place on top of chicken. You can see that I left out some on the chicken pieces in the middle. That's because my sweet little man Trey doesn't care for them. He really only likes this chicken without the bacon and cheese and onions. He's a bit picky in his old age.


Next your going to use that bacon that's been staring at you begging you to eat just one piece. Put that on top of the onions. I used 1 and 1/2 pieces on each.


Next, scoop up about 1/3 cup of that grated cheddar and put it on top of the bacon.
I never said this was healthy. Just really, really, really good. Everything is fine in moderation.
When that is all assembled, throw the skillet into a 350 degree oven and cook for about 20-25 minutes.


When it's done, it will look like this.
Oh my it is sooooo good.
Here is the original recipe from Mommy's Kitchen.


Now, for my second stolen recipe of the day. God bless Ree Drummond, for posting these here. http://thepioneerwoman.com/cooking/2008/06/crash-hot-potatoes/

I just found this recipe Sunday, and we have had them twice this week. My love told me they were like a delicious cross between a french fry and a baked potato. This is my new favorite way to eat potatoes.

Here is what you'll need.


Oh, and this glorious rosemary that I made Kaylee steal from my neighbors bush.
You will need a couple of tablespoons of that, chopped.


Put at least 2 tablespoons on the ugliest baking sheet you have. Or maybe that's just me? Anyway, you want oil ALL OVER the pan so these potatoes won't stick. You'll be glad you did. It will also help them crisp up VERY nicely.


Now, I have to apologize to y'all for missing a few pictures here, but surely every one of my 12 DEVOTED followers know how to boil potatoes? right? If not, just call me, I'll fill ya in.
Jackson was getting hungry about this time, and was on my hip while I was cooking and attempting to take pictures and helping Trey with his homework at the same time.
So..............just boil the potatoes until they are tender. I actually boiled mine a bit too long, because they started cracking open. It really didn't make a bit of difference though. When they are done, put them on that ugly baking sheet.


like this........


If you have a potato masher, great! Use it. You just give the potato a mash all over until it's all smooshed down. I don't have a masher (I should get one), so I used the bottom of a small plate. It worked just fine.


See???


cut yourself about 4 tablespoons of butter


and melt it


Sprinkle sea salt or kosher salt and freshly cracked black pepper all over the potatoes.


Brush or drizzle the melted butter all over the potatoes.


OOPS! I almost forgot the rosemary! Sprinkle that on the potatoes too.


Cook them in an oven that has been preheated to 450 degrees for about 25 minutes. They will be nice and brown and crispy.
like this..........


Now, there is just NO WAY to put these 2 on a plate together and make it pretty. At least I never figured it out. We were hungry and ready to eat, so I just snapped the picture and served up supper.
These potatoes are sooooooooooo good I can't stand it. Even my little picky Trey man ate them up!